Are you struggling to achieve the perfect sound? An audio mixer is essential for enhancing audio quality in any production. In this article, we’ll explore five key steps to optimize your mixing skills. Whether you're a beginner or a pro, mastering these tips will elevate your sound quality significantly.

Understanding the Basics of Audio Mixing
What Does an Audio Mixer Do?
Audio mixers play a crucial role in sound production. They blend multiple audio signals into one cohesive output. This process involves adjusting levels, panning, and applying effects to create the desired sound.
Explanation of the Audio Mixing Process
The audio mixing process consists of several key steps:
1. Input Signals: Various audio sources, like microphones and instruments, are connected to the mixer.
2. Adjusting Levels: Each channel’s volume is adjusted to ensure a balanced mix.
3. Panning: This technique places sounds in the stereo field, enhancing spatial awareness.
4. Applying Effects: Effects like reverb or delay can be added to enrich the sound.
5. Output: The final mix is sent to speakers or recording devices.
This process allows for creativity and precision, ensuring that every element is heard clearly.
Different Types of Audio Mixers
When choosing an audio mixer, you'll encounter two main types: analog and digital.
● Analog Mixers: These use physical components to process sound. They are often favored for their warm, natural sound. Many musicians appreciate the tactile experience of faders and knobs.
● Digital Mixers: These utilize software to manipulate audio. They offer more flexibility and features, such as built-in effects and automation. Digital mixers are ideal for complex setups and live performances.
Feature | Analog Mixers | Digital Mixers |
Sound Quality | Warm, natural | Versatile, precise |
User Interface | Physical controls | Software-based |
Effects | Limited | Extensive |
Price Range | Generally lower | Can be higher |
Common Applications of Audio Mixers
Audio mixers are used in various settings, including:
● Music Production: Essential for recording and mixing tracks in studios.
● Broadcasting: Used in radio and television to manage sound for shows.
● Live Events: Crucial for concerts and events, ensuring the audience hears everything clearly.
Each application requires specific skills and knowledge to maximize the mixer’s potential. Understanding these contexts helps users choose the right mixer for their needs.
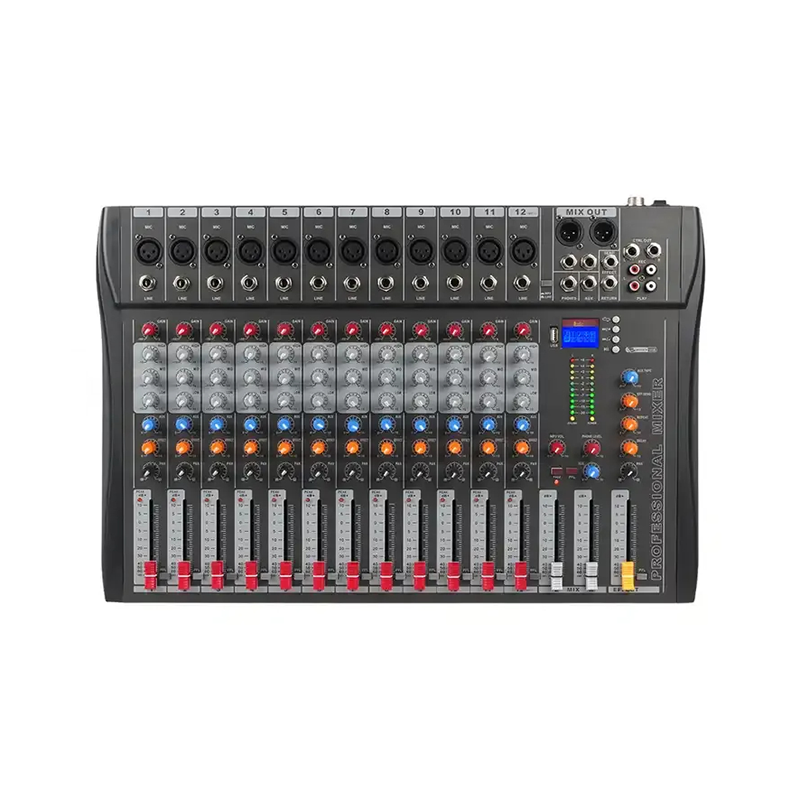
Key Components of an Audio Mixer
Understanding the key components of an audio mixer is essential for effective sound mixing. Each part plays a vital role in shaping the audio output. Let’s dive into the main features.
Inputs and Outputs
Inputs and outputs are the backbone of any audio mixer. They allow sound to flow in and out efficiently.
Types of Inputs:
● XLR: Commonly used for microphones. It provides a balanced connection, reducing noise.
● TRS (Tip-Ring-Sleeve): Often used for instruments. It can handle both mono and stereo signals.
● USB: Great for connecting to computers. It allows for easy recording and playback of digital audio.
● Bluetooth: Offers wireless connectivity. This is handy for modern setups, eliminating cable clutter.
Overview of Output Options:
● MIX OUT: This is the main output. It sends the final mix to speakers or recording devices.
● Headphone Outputs: Essential for monitoring sound. They let you listen without disturbing others.
● Digital Outputs: Used for high-quality digital audio transfer. These outputs can connect to various digital devices.
Control Interfaces
The control interface of an audio mixer is where the magic happens. It allows users to manipulate sound in real time.
Overview of Control Options:
● Knobs: These are commonly used for adjusting levels and effects. They provide tactile feedback, making adjustments intuitive.
● Faders: Ideal for controlling volume levels. Faders allow for smooth transitions and precise control.
● Touch Screens: Many modern mixers feature touch screens. They offer a visual interface for easy navigation and control.
Importance of User-Friendly Interfaces:
A user-friendly interface is crucial for effective mixing. Here’s why:
● Efficiency: Easy-to-use controls save time during live performances.
● Precision: Clear labeling and intuitive layouts help avoid mistakes.
● Learning Curve: New users can quickly understand how to operate the mixer.
Control Type | Advantages | Disadvantages |
Knobs | Tactile feedback | Can be less precise |
Faders | Smooth transitions | Takes up more space |
Touch Screens | Visual interface | May require learning curve |
By understanding these components, you can better utilize your audio mixer for optimal sound quality. Each part contributes to the overall mixing experience, making it essential to know how they work together.
Step 1: Optimize Your Audio Mixer Settings
Understanding Channel Configuration
Channel configuration is a fundamental aspect of using an audio mixer. It directly influences how sound is managed in various settings. Let’s break down the key elements of channel configuration.
Explanation of Channel Counts
Channel counts refer to the number of audio inputs a mixer can handle. Common configurations include:
● 12-Channel Mixer: Suitable for smaller setups. Ideal for solo artists or small bands.
● 16-Channel Mixer: Offers more flexibility. Great for medium-sized bands or events.
● 24-Channel Mixer and Beyond: Perfect for larger productions. This allows for multiple instruments and vocalists.
Channel Count Overview:
Channel Count | Best For |
12 Channels | Solo artists, small bands |
16 Channels | Medium-sized bands, events |
24+ Channels | Large productions, orchestras |
How to Choose the Right Channel Configuration
Choosing the right channel configuration depends on your specific needs. Here are some tips:
1. Assess Your Setup: Consider the number of instruments and microphones you'll use. This helps determine the required channels.
2. Future Needs: Think about potential growth. If you plan to expand your setup, opt for a mixer with more channels.
3. Venue Size: Larger venues may require more channels to accommodate additional sound sources.
Tips for Managing Inputs Effectively
Managing inputs effectively is crucial, especially in different venue sizes. Here’s how to do it:
● Small Venues:
○ Limit Inputs: Use only essential instruments and vocals. This keeps the setup simple.
○ Prioritize Quality: Focus on high-quality microphones and cables to enhance sound.
● Large Venues:
○ Use Submixes: Group similar instruments together. This makes it easier to manage multiple inputs.
○ Plan for Monitoring: Ensure adequate monitoring options for performers. This helps them hear themselves clearly.
Venue Size | Input Management Tips |
Small | Limit inputs, prioritize quality |
Large | Use submixes, plan for monitoring |
Understanding channel configuration is vital for effective mixing. By knowing how to choose and manage channels, you can optimize your audio setup for any situation.
Adjusting Gain and Levels
Adjusting gain and levels is crucial for achieving high-quality sound in your audio mixer. Proper management of these settings can significantly enhance your audio output. Let’s explore the key aspects.
Importance of Setting Proper Gain Levels
Setting the right gain levels is the foundation of good sound. Here’s why it matters:
● Clarity: Proper gain ensures that each instrument and vocal is clear and distinct.
● Dynamic Range: It allows for a wider dynamic range, preserving the nuances of the performance.
● Prevention of Distortion: Correct gain levels help avoid unwanted distortion, ensuring a clean mix.
Visual Representation of Gain Levels:
Gain Level | Description |
Low Gain | Sound may be too quiet |
Optimal Gain | Clear, balanced sound |
High Gain | Risk of clipping/distortion |
Techniques for Achieving Balanced Sound
Achieving a balanced sound involves several techniques. Here are some effective methods:
1. Start with the Faders: Begin with all faders at a neutral position. This helps you gauge the overall mix.
2. Adjust Gain First: Focus on adjusting gain levels before moving faders. This sets a solid foundation.
3. Use Visual Aids: Many mixers have LED meters. Keep an eye on these to ensure levels are within a safe range.
4. Listen Critically: Use your ears! Make adjustments based on what sounds best, not just meter readings.
Common Mistakes to Avoid When Adjusting Levels
Avoiding common mistakes can save you from frustrating sound issues. Here are some pitfalls to watch out for:
● Clipping: This occurs when the gain is set too high, causing distortion. Keep an eye on the meters to prevent this.
● Ignoring Background Noise: Failing to account for ambient noise can muddy your mix. Always check the environment.
● Neglecting Headroom: Ensure there’s enough headroom for peaks in the audio. Aim for a few dB below the maximum level.
● Overcompensating: Don’t crank up the gain too much to compensate for low levels. Instead, find the right balance.
Mistake | Consequence | Solution |
Clipping | Distorted sound | Monitor levels closely |
Ignoring Background | Muddy mix | Check ambient noise levels |
Neglecting Headroom | Distortion on peaks | Maintain a few dB of headroom |
Overcompensating | Unbalanced sound | Adjust levels gradually |
By mastering gain and level adjustments, you can significantly improve your audio mixing quality. Understanding these concepts helps create a polished and professional sound.
Step 2: Utilize Built-in Effects Wisely
Types of Built-in Effects
Built-in effects are essential tools in an audio mixer, enhancing sound quality and adding depth to your mix. Let’s dive into the most common effects and their applications.
Overview of Common Effects
Here are some popular built-in effects you’ll find in many audio mixers:
1. Reverb: This effect simulates the natural echo of sound in a space. It creates a sense of depth and atmosphere.
2. Delay: Delay repeats the sound after a set time, creating an echo effect. It can add richness and complexity to audio.
3. Chorus: This effect duplicates the sound and slightly alters the pitch and timing. It thickens the audio, making it feel fuller.
4. Flanger: Flanging creates a sweeping, jet-like sound by mixing delayed audio with the original. It adds movement and texture.
Quick Reference Table of Effects:
Effect | Description | Use Case |
Reverb | Simulates echo in a space | Vocals, guitars |
Delay | Repeats sound after a delay | Vocals, drums |
Chorus | Thickens sound with slight variations | Guitars, keyboards |
Flanger | Creates a sweeping jet-like sound | Vocals, synths |
How Each Effect Can Enhance Sound Quality
Each effect brings unique qualities to your mix:
● Reverb: Adds warmth and depth, making vocals feel more immersive. It’s perfect for ballads and ambient music.
● Delay: Enhances rhythm and adds interest. It works well in genres like rock and pop, where layered sounds are common.
● Chorus: Creates a lush sound, especially effective on clean guitar riffs. It can transform a simple melody into something vibrant.
● Flanger: Introduces dynamic movement. Great for electronic music, it can make synth lines stand out.
Versatility of Effects and Their Applications
These effects are incredibly versatile. Here’s how they can be applied across different instruments and vocals:
● Vocals: Reverb and delay can make vocals soar, adding emotional depth. Chorus can thicken harmonies, while flanger adds excitement.
● Guitars: Reverb and chorus are popular for electric guitars, creating rich textures. Delay can enhance solos, giving them more presence.
● Drums: Applying reverb can create a spacious feel. Delay can add groove, especially on snare hits.
● Keyboards: Chorus and flanger can breathe life into keyboard sounds, making them more engaging.
Application Chart:
Instrument | Recommended Effects |
Vocals | Reverb, Delay, Chorus |
Guitars | Reverb, Chorus, Delay |
Drums | Reverb, Delay |
Keyboards | Chorus, Flanger |
Utilizing built-in effects effectively can transform your audio mixing experience, enhancing the overall sound quality and making your mix more engaging.
Creative Use of Effects
Using effects creatively can elevate your audio mixing game. However, it’s essential to find the right balance. Let’s explore some practical tips and examples.
Tips for Using Effects Without Overdoing Them
1. Start Subtle: Begin with low levels of effects. You can always increase them later if needed.
2. Use Automation: Automate effects to change levels dynamically throughout the track. This keeps the mix interesting without overwhelming the listener.
3. Focus on the Mix: Ensure that effects enhance rather than overshadow the main elements. Always prioritize clarity.
4. Listen in Context: Always listen to effects within the full mix. What sounds good solo might not fit well in the entire track.
Quick Reference for Effect Levels:
Effect Type | Recommended Starting Level |
Reverb | 10-20% |
Delay | 15-25% |
Chorus | 5-15% |
Flanger | 5-10% |
Examples of How to Apply Effects to Different Audio Sources
Different audio sources require tailored approaches. Here are some examples:
● Vocals:
○ Reverb: Adds depth. Use a moderate level to create space without drowning the voice.
○ Delay: Can enhance phrases. A short delay can add richness, especially in choruses.
● Guitars:
○ Chorus: Thickens the sound. Apply it to clean guitar parts for a lush effect.
○ Delay: Use it on solos to create a sense of movement and sustain.
● Drums:
○ Reverb: Gives a live feel. Use a short reverb for snare drums to add punch.
○ Flanger: Can create unique textures. Apply it sparingly on cymbals for a shimmering effect.
Application Chart for Audio Sources:
Audio Source | Recommended Effects | Tips for Application |
Vocals | Reverb, Delay | Keep it subtle; listen in context |
Guitars | Chorus, Delay | Use chorus for thickness |
Drums | Reverb, Flanger | Short reverb for snare punch |
Importance of Understanding the Environment
The environment plays a crucial role in how effects are applied:
● Live Settings: In live performances, consider the acoustics of the venue. Too much reverb can muddy the sound. Use effects that complement the natural ambiance.
● Studio Settings: In a controlled studio environment, you have more flexibility. You can experiment with various effects without worrying about external noise.
Key Considerations:
Environment | Effect Application Tips |
Live | Use less reverb; focus on clarity |
Studio | Experiment with different effects freely |
Understanding how to use effects creatively and appropriately can significantly enhance your audio mixing process. By keeping these tips in mind, you’ll create a more polished and engaging sound.

Step 3: Incorporate EQ (Equalization)
What is EQ and Why is it Important?
Equalization, or EQ, is a fundamental tool in audio mixing. It shapes the sound by adjusting the balance of different frequencies. Let’s break down what EQ is, its types, and why it matters.
Explanation of Equalization and Its Role in Sound Mixing
EQ allows you to enhance or reduce specific frequency ranges within an audio signal. This process helps create a balanced mix, ensuring each instrument and vocal can be heard clearly. By adjusting frequencies, we can:
● Boost: Increase certain frequencies to make sounds more prominent.
● Cut: Decrease frequencies that may be muddy or overpowering.
Using EQ effectively can transform a flat mix into a vibrant one.
Key Benefits of EQ:
● Improves clarity.
● Enhances presence.
● Helps achieve a polished sound.
Different Types of EQ
There are two main types of EQ used in audio mixing:
1. Parametric EQ:
a. Offers precise control over frequency selection.
b. Allows adjustments of bandwidth (Q) and gain.
c. Ideal for detailed sculpting of sound.
2. Graphic EQ:
a. Displays fixed frequency bands on a slider interface.
b. Easier for quick adjustments.
c. Useful for live sound settings.
Comparison Chart of EQ Types:
EQ Type | Control Level | Typical Use |
Parametric | High | Studio mixing |
Graphic | Moderate | Live sound, simple adjustments |
The Significance of EQ in Achieving Clarity and Separation in a Mix
EQ plays a crucial role in achieving clarity and separation among different elements in a mix. Here’s how it helps:
● Clarity: By cutting unwanted frequencies, you can reduce muddiness. This makes vocals and instruments stand out.
● Separation: EQ helps define space for each sound. For example, boosting the high frequencies of a vocal can help it sit above a dense mix of instruments.
Practical Tips for Using EQ:
● Identify Problem Frequencies: Use sweeping techniques to find frequencies that sound harsh or muddy.
● Use Subtractive EQ: Start by cutting frequencies before boosting. This keeps the mix clean.
● Listen in Context: Always adjust EQ while listening to the entire mix, not just isolated tracks.
By understanding EQ and its importance, you can significantly enhance your mixing skills. Mastering this tool will lead to clearer, more professional-sounding audio.
Tips for Effective EQ Usage
Using EQ effectively can make a huge difference in your audio mixing. Here are some practical tips to help you enhance sound quality through equalization.
How to Identify Frequency Ranges for Various Instruments
Understanding the frequency ranges of different instruments is crucial. Here’s a quick reference guide:
Instrument | Frequency Range (Hz) |
Kick Drum | 50 - 100 |
Snare Drum | 200 - 400 |
Vocals | 80 - 300 (fundamental) |
Guitars | 100 - 300 (low), 1k - 3k (high) |
Bass | 40 - 250 |
Tips for Identifying Frequencies:
● Use a Spectrum Analyzer: Visual tools can help you see where frequencies are concentrated.
● Listen Actively: Pay attention to how each instrument contributes to the mix. This can guide your adjustments.
Techniques for Cutting and Boosting Frequencies to Enhance Clarity
When it comes to EQ, knowing when to cut and when to boost is key. Here are some techniques:
1. Cutting Frequencies:
a. Start by identifying problematic areas. For example, if a sound is muddy, try cutting around 200-500 Hz.
b. Use a narrow Q setting for precise cuts, especially in crowded mixes.
2. Boosting Frequencies:
a. Boosting should be done sparingly. A small boost of 3-6 dB can make a significant difference.
b. Focus on enhancing presence. For vocals, boosting around 3-5 kHz can help them cut through the mix.
Quick Tips for EQ Adjustments:
● Less is More: Avoid extreme boosts or cuts. Subtle changes often yield better results.
● A/B Testing: Regularly compare your adjustments by toggling the EQ on and off. This helps you hear the impact of your changes.
Practical Examples of EQ Adjustments for Common Instruments
Here are some specific EQ adjustments for popular instruments:
● Guitars:
○ Cut: Reduce frequencies around 300-400 Hz to remove muddiness.
○ Boost: Add a slight boost around 2-4 kHz for clarity.
● Vocals:
○ Cut: Remove low frequencies below 80 Hz to eliminate rumble.
○ Boost: Enhance the presence by boosting around 3 kHz.
● Bass:
○ Cut: Reduce frequencies above 250 Hz to avoid clashing with guitars.
○ Boost: Add a slight boost around 60-80 Hz for warmth.
Example EQ Settings for Instruments:
Instrument | Frequency Cuts (Hz) | Frequency Boosts (Hz) |
Guitars | 300 - 400 | 2,000 - 4,000 |
Vocals | < 80 | 3,000 |
Bass | > 250 | 60 - 80 |
By applying these tips and techniques, you can master EQ usage and significantly improve the clarity and quality of your mixes. Understanding frequency ranges and making thoughtful adjustments will lead to a more polished final product.
Step 4: Monitor Your Mix Effectively
Importance of Monitoring
Monitoring is a critical aspect of audio mixing. It ensures that what you hear is accurate, allowing you to make informed decisions about your sound. Let’s explore why monitoring matters and the different options available.
Why Monitoring is Crucial for Sound Quality
Effective monitoring allows you to hear every detail in your mix. Here’s why it’s so important:
● Accurate Representation: Good monitoring reveals the true sound of your mix. This helps you identify issues like muddiness or harshness.
● Consistency: Regular monitoring ensures your mixes translate well across different playback systems. You want your music to sound great on headphones, speakers, and more.
● Critical Listening: It enhances your ability to make precise adjustments. You can catch subtle nuances that might be missed otherwise.
Key Benefits of Monitoring:
● Detects frequency imbalances.
● Helps with dynamic range control.
● Ensures clarity and separation among instruments.
Different Monitoring Options
When it comes to monitoring, you have several options. Each has its strengths and weaknesses:
1. Headphones:
a. Pros:Portable and convenient.
i. Isolate sound effectively, reducing external noise.
b. Cons:Can exaggerate certain frequencies.
i. Limited stereo imaging compared to speakers.
2. Studio Monitors:
a. Pros:Provide a more accurate sound representation.
i. Better stereo imaging and depth.
b. Cons:Require more space.
i. Can be affected by room acoustics.
Comparison Chart of Monitoring Options:
Monitoring Type | Pros | Cons |
Headphones | Portable, isolates sound | Frequency exaggeration |
Studio Monitors | Accurate, good imaging | Requires space, room issues |
The Role of Dedicated Headphone Outputs in Monitoring
Dedicated headphone outputs are essential for effective monitoring. Here’s why they matter:
● Enhanced Sound Quality: These outputs are designed to drive headphones efficiently, providing a clearer and more balanced sound.
● Level Control: Many dedicated outputs offer independent volume controls. This allows you to adjust levels without affecting the main mix.
● Reduced Latency: Using dedicated outputs can minimize latency, ensuring you hear your mix in real-time.
Key Features of Dedicated Headphone Outputs:
● Impedance Matching: Ensures optimal performance with various headphone types.
● Multiple Outputs: Some interfaces offer multiple headphone outputs, allowing for collaborative work.
● Direct Monitoring: Many provide a direct monitoring option, letting you hear your input signal without any delay.
By choosing the right monitoring setup and understanding its importance, you can significantly enhance your mixing process. Quality monitoring leads to better sound quality, ensuring your final product is polished and professional.
Tips for Effective Monitoring
Creating an effective monitoring environment is essential for achieving high-quality sound in audio mixing. Here are some practical tips to enhance your monitoring setup and techniques for critical listening.
How to Set Up a Monitoring Environment
Setting up your monitoring space correctly can make a huge difference. Here’s how to do it:
1. Choose the Right Room:
a. Select a quiet space, free from distractions.
b. Avoid rooms with hard surfaces that create echo.
2. Position Your Monitors:
a. Place studio monitors at ear level, forming an equilateral triangle with your listening position.
b. Keep them away from walls to reduce reflections.
3. Control Room Acoustics:
a. Use acoustic panels or foam to dampen sound reflections.
b. Consider bass traps in corners to manage low frequencies.
Quick Setup Checklist:
● Quiet room selected
● Monitors positioned correctly
● Acoustic treatment installed
Techniques for Critical Listening and Making Adjustments
Critical listening is vital for identifying issues in your mix. Here are some techniques to improve your listening skills:
● Take Breaks: Regular breaks help reset your ears. This prevents fatigue and keeps your perception sharp.
● Reference Tracks: Use professionally mixed tracks as references. Compare your mix to understand tonal balance and dynamics.
● Listen at Different Volumes: Test your mix at low and high volumes. This helps identify problems that may not be apparent at a single level.
Listening Techniques:
Technique | Description |
Breaks | Rest your ears to maintain clarity |
Reference Tracks | Compare your mix against industry standards |
Volume Variations | Listen at different levels to catch issues |
Importance of Independent Volume Controls for Monitoring
Independent volume controls are crucial for effective monitoring. Here’s why they enhance the mixing process:
● Personalized Levels: They allow you to adjust headphone and monitor levels separately. This ensures you can hear everything clearly without compromising the mix.
● Real-Time Adjustments: You can quickly modify levels while mixing. This flexibility helps in making immediate corrections.
● Collaboration: In a collaborative setting, independent controls let each person adjust their listening levels without affecting others.
Key Benefits of Independent Volume Controls:
● Enhanced clarity: Clearer sound for critical listening.
● Flexibility: Adjust levels on the fly for optimal mixing.
● Improved collaboration: Everyone hears what they need without disruption.
By optimizing your monitoring environment and employing these techniques, you can significantly improve your mixing process. Effective monitoring leads to better sound quality, allowing you to create polished, professional audio mixes.
Step 5: Regularly Maintain Your Audio Mixer
Importance of Maintenance
Regular maintenance is crucial for keeping your audio mixer in top shape. It not only ensures optimal performance but also prolongs the lifespan of your equipment. Let’s dive into why maintenance matters and some common issues that can affect sound quality.
Why Regular Maintenance is Essential for Optimal Performance
Maintaining your audio mixer is key to achieving the best sound quality. Here’s why it’s important:
● Consistent Performance: Regular checks help ensure your mixer operates smoothly, avoiding unexpected failures during critical sessions.
● Quality Sound: Over time, dirt and dust can accumulate, affecting sound clarity. Regular cleaning keeps your audio output pristine.
● Longevity of Equipment: Just like any machine, mixers benefit from care. Proper maintenance can extend their lifespan significantly.
Benefits of Regular Maintenance:
Benefit | Description |
Consistent Performance | Smooth operation reduces unexpected failures |
Quality Sound | Clean equipment ensures clear audio output |
Longevity of Equipment | Care extends the lifespan of your mixer |
Common Issues That Can Affect Sound Quality
Several issues can arise if maintenance is neglected. Here are some common culprits:
1. Dirty Connections:
a. Dust and grime can build up on jacks and cables, leading to poor signal transmission. This results in crackling or muted sounds.
b. Tip: Regularly clean connections using appropriate cleaning solutions.
2. Outdated Firmware:
a. Many modern mixers come with firmware updates. Not updating your firmware can lead to bugs or compatibility issues that affect performance.
b. Tip: Check the manufacturer’s website for updates regularly.
3. Worn Cables:
a. Cables can fray or become damaged over time, leading to signal loss or interference. This can significantly degrade sound quality.
b. Tip: Inspect cables frequently and replace any that show signs of wear.
Common Issues Checklist:
● Inspect and clean connections
● Check for firmware updates
● Examine cables for wear and tear
By staying on top of maintenance, you can ensure your audio mixer performs at its best. Addressing these common issues will help you achieve high-quality sound, making your mixing process smoother and more enjoyable.
Maintenance Tips
Caring for your audio mixer is essential to maintain its performance and sound quality. Here are some practical maintenance tips to keep your equipment in top condition.
Cleaning and Caring for Your Audio Mixer
Regular cleaning can prevent buildup that affects sound quality. Here’s how to properly care for your mixer:
● Dust Regularly: Use a soft, dry cloth to wipe down the surface. This helps remove dust that can interfere with controls and connections.
● Clean Connections: Use contact cleaner on jacks and plugs. Dirty connections can lead to crackling sounds.
● Avoid Food and Drinks: Keep liquids and snacks away from your mixer. Spills can cause serious damage.
Cleaning Checklist:
Task | Frequency |
Dust surfaces | Weekly |
Clean connections | Monthly |
Inspect cables | Every session |
When to Seek Professional Servicing
While regular maintenance is essential, sometimes you need professional help. Here are signs that it’s time to call in the experts:
● Unusual Noises: If you hear buzzing or crackling that cleaning doesn’t fix, it may indicate internal issues.
● Inconsistent Performance: If your mixer frequently drops signals or malfunctions, it’s time for a professional check.
● Physical Damage: Any visible damage, like cracks or broken knobs, should be addressed immediately.
Signs to Seek Help:
● Unusual noises
● Inconsistent performance
● Visible damage
The Benefits of Built-in Features Like 48V Phantom Power
Modern audio mixers often come equipped with helpful features, such as 48V phantom power. Here’s why this feature is beneficial:
● Simplified Setups: Phantom power allows you to connect condenser microphones directly without needing extra equipment. This saves time and reduces clutter.
● Enhanced Sound Quality: Condenser microphones often require phantom power for optimal performance. It ensures they capture sound accurately.
● Flexibility: With phantom power, you can easily switch between dynamic and condenser mics based on your needs.
Benefits of 48V Phantom Power:
Benefit | Description |
Simplified Setups | Easy connection without extra gear |
Enhanced Sound Quality | Optimal performance for condenser mics |
Flexibility | Switch between mic types effortlessly |
By following these maintenance tips, you can keep your audio mixer performing at its best. Regular care, knowing when to seek help, and utilizing built-in features will enhance your overall mixing experience.
Conclusion
In summary, enhancing sound quality with your audio mixer involves five key steps.
These include regular maintenance, cleaning, and utilizing built-in features.
Practice these tips to achieve better audio mixing results.
We encourage you to share your experiences or ask questions in the comments below!


 +86-18822957988
  rick@lihuitech.com
  +86-13925512558
  Hengbang Technology Park Lihui Technology Co., Ltd., No. 8 Weiheng Road, Niushan Industrial Zone, Dongguan City